Integrating with Zapier
The Triggerbee integration to Zapier allows you to connect with 7000+ apps outside the Triggerbee native integrations. Triggerbee will send data to Zapier, and Zapier will take it from there. This is how you set up the integration!
How to set up the integration
- Navigate to My Triggerbee > Triggerbee Apps & Integrations, and activate the Zapier app.

If you haven’t activated Zapier already, click on the button "browse apps" and scroll down to select Zapier.

- Connect with Zapier by clicking "configure".

- Copy the API key by clicking "GET API KEY".

Set up your zaps in Zapier
The next step is to set up your zaps in the Zapier portal. You can find the Triggerbee app on the Zapier app market by navigating to the following link Triggerbee Integrations | Connect Your Apps with Zapier and clicking the button ‘Connect Triggerbee to 6,000+ apps’ or search for the app you want to connect triggerbee to:

In the Zap editor, there are a few things to keep in mind. A zap consists of two or more actions, usually the first action is the one receiving input from your source app, in this case, Triggerbee, the second is the app you want to send the data to or trigger an automation in, etc (for example sending an email).
How to set up a basic Zap:
- In the first step, the first action is to choose Triggerbee as the app. Choose our only trigger event ‘New Visitor Session’ as the Trigger event, and use the Api Key that you copied from our Apps and Integrations page, to create a new connection to Triggerbee for the account field when prompted.

In the second step of the first action, please add an identifier to the Zap. This identifier is what the Triggerbee app considers its name, so be aware that this identifier is what you will see in the Triggerbee app and not the actual name of the Zap:

The red arrow shows the name of the Zap that is shown in the Zapier portal only. The green arrow shows the name of the Zap that is shown in the Triggerbee app. To avoid confusion, consider using the same name in both cases. However, it is important that the Identifier field uniquely identifies each of your Zaps for the Zap to work as intended.
- In the third step, you can simply click ‘Test trigger’, and after the test passes click ‘Continue with the selected record’. This part will not affect how your Zap will function but simply makes sure that the trigger is working in the Triggerbee integration.
Now we want to set up the second action. This action will make use of the data that comes from Triggerbee through the first action. In this case, we set up a simple Gmail action that sends an email when the Visitor Session event triggers.
- In your second action, you will want to insert data fields that come from Triggerbee. Just click the plus sign in any field and you can search for the fields that are available from the Visitor Session event.
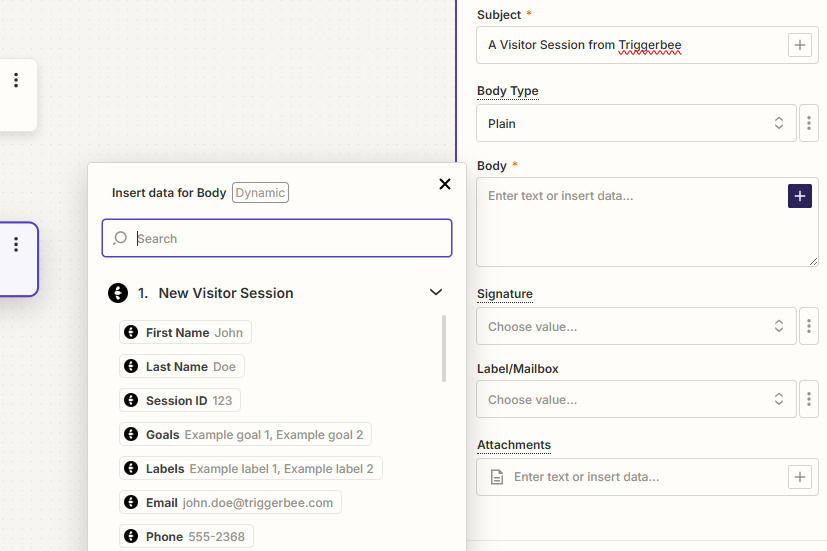
- Here we construct the body of an email using some of the properties from the onsite visits that will trigger the Zap, as well as some of the form input fields that you can include in your Triggerbee campaigns.

When you are happy with the second action, you can run an optional test and then publish the Zap.

If the Zap is successfully published, you will find the Zap to be selectable when setting up your Trigger Zap action on the Triggerbee automation page:
